These are the best ways to organize your CSGO inventory
Counter-Strike is known for its snappy gunplay, intricate mechanics, deep strategy, and for better or worse, its many items. While most players come to the game looking for a competitive experience, for some the first exposure to CSGO comes from the game’s weapon skins. It’s not just weapon skins that help fill out Counter-Strike’s economy, either. The game also offers things like display items, patches, pins, graffiti sprays, and even stickers that players can stick on their digital weapons.
All that stuff has to be stored somewhere and ready to go at a moment’s notice. Enter Valve’s Steam Inventory.
How to organize your CSGO skin inventory on Steam
Inside the Steam client, each user profile has its own dedicated inventory space that serves as a digital warehouse for each one of the user’s items. It has a search function, the ability to separate items into their own game categories, and a drag-and-drop trading system that might be the most used trading platform in gaming. The Steam Inventory is more than just a handy feature; it’s one of many ideas that has made Valve the world’s largest digital distributors of PC games.
For all of that innovation, Steam is missing one critical function. Even though Valve has focused on making it easy for users to buy and use in-game items, Steam lacks a built-in way for a player to organize all those items. CSGO has its own in-game filters and search options, but the order of a player’s items is literally set in stone. Like a universal law, a player’s most expensive or impressive items are tossed into the computer equivalent of Steam’s junk drawer.

Thankfully, there are a few ways that players can trick Steam into showing the user, as well as anyone who views their profile, their collected items in exactly whatever order they want. These tricks are sometimes complicated and sometimes full of repetition, but can produce an organized Steam Inventory.
There are ways to rearrange these items, but before a player decides to do it, they should know a few things:
- There are two ways to reorganize a Steam Inventory, and both are long and potentially monotonous.
- One way involves creating another account. While not against Valve’s Terms of Service, users will have to wait out the new account’s 14-day trade ban and pair the account with a phone number if they don’t want to wait out another seven-day trade hold each time they reorganize a section of their inventory.
- The other method involves “stashing” an item on the Steam Market. There’s no real risk if the item isn’t expensive. If a player is reorganizing an inventory with a knife or other expensive skins, this method isn’t worth the risk.
- Currently, only items that can be sold on the Steam Market or traded through Steam’s trading interface can be rearranged
Right off the bat, the following methods work for any tradeable or marketable item coming from any game on Steam. There are also exceptions, like the fact that some items cannot be removed from a player’s account, which means that they can’t be rearranged. These items are fairly rare, but two widely owned CSGO items in the five-year coin and the Trust Factor pin can’t be organized in the same way that the vast majority of Counter-Strike’s other items can be.
How Steam’s organizing system works for CSGO items
The answer really depends on the individual. Users that make frequent trades might find these workarounds handy so potential partners can navigate their inventory easier. Collectors who have large inventories may want to do some particular organization, like categorizing by weapon, color, type, or other criteria to tidy things up. And if a player with 15 items wants to rearrange their smaller inventory, there’s no reason why they shouldn’t.
So here’s how it all works.
Valve keeps track of every item that the Steam platform creates. Take a Counter-Strike weapon skin, for example. Steam records data that is unique to that skin, and only that skin, including:
- Whether it came from a case, dropped at the end of a match, whether it was a promotional item, etc.
- The exact time and date it was created by the server
- The skin’s trade history and its previous owners
- The float value and pattern index
- A custom name if the user has used a name tag
- Stickers that are attached to the weapon, their wear values, and their locations
Steam organizes items by what is basically a “last modified” filter. Many times, that date ends up being that date that the user first opened or received the item. That’s why new items are at the top and old ones at the bottom. Steam’s default system is basically filtering by “date added.” In order to change the position of an item in an inventory, we have to force a change to the item’s data. There are four ways that Steam users can do this.
The first option is simple but can become very expensive if the player has more than a few skins, and it only works for certain types of inventory items. The second method involves using the Steam Market to transfer ownership of the item away from and then back to the user’s profile. Finally, the third method uses a Steam trade to ship items to an alternate account before trading them back in the order that the user wants to display them.
Preparing to organize your Steam inventory
Players need to prepare before jumping in by grabbing a pen and several pieces of paper, or opening a new spreadsheet.
- Write down a list of every single item that needs to be moved
- Cross off any item that can’t be moved. These are marked Untradeable, Unmarketable. or both, like the Prime and Five Year coins.
- Star any StatTrack items that the player wants to keep the StatTrack count for.
- Star any expensive items and any items that the player would be upset to lose. We’ll move these a special way.
- Order the list in the order they want their skins exactly how they want .
- For example, If we wanted the P245 Sand Dune to be the first skin in our inventory, we would list it first.
- Make two clean copies. Players will use one when actually moving the items. The other is so users have a clean list of all items that were moved, just in the event that something happens they have a clear record of what was moved and how it was moved.
The last part players need to pay attention to is the order in which they want their items. When scraping a sticker or using a name tag in the first method or canceling a Steam Market listing in the second, players have to work from the end of their list to the top. The item they want at the top of their inventory should be the last item they use the method on.
Method 1: Rearranging a CSGO inventory using a name tag or sticker
This method is the easiest out of the three, but it’s limited in how it can be used. Since a user can change the skin’s data by changing its properties, applying a name tag or a sticker effectively does just that. By adding either one to the weapon, the user forces Steam to update the skin’s data, changing the “last modified” date and moving the skin to the top of the inventory. While this works fine for weapon skins, players can’t name or place a sticker on another sticker, a graffiti spray, or a pin, meaning that the 440 sprays in every CSGO player’s inventory are doomed to stay unorganized. Forever.
Unfortunately, players can’t use this method on many of their CSGO items, including pins, other stickers, name tags, StatTrack swap kits, or CSGO’s new agents. Stickers in particular can’t be used to move Counter-Strike’s famous knives, forcing players to use a relatively expensive name tag instead. There are upsides to this method, though, especially when paired with the two methods below.
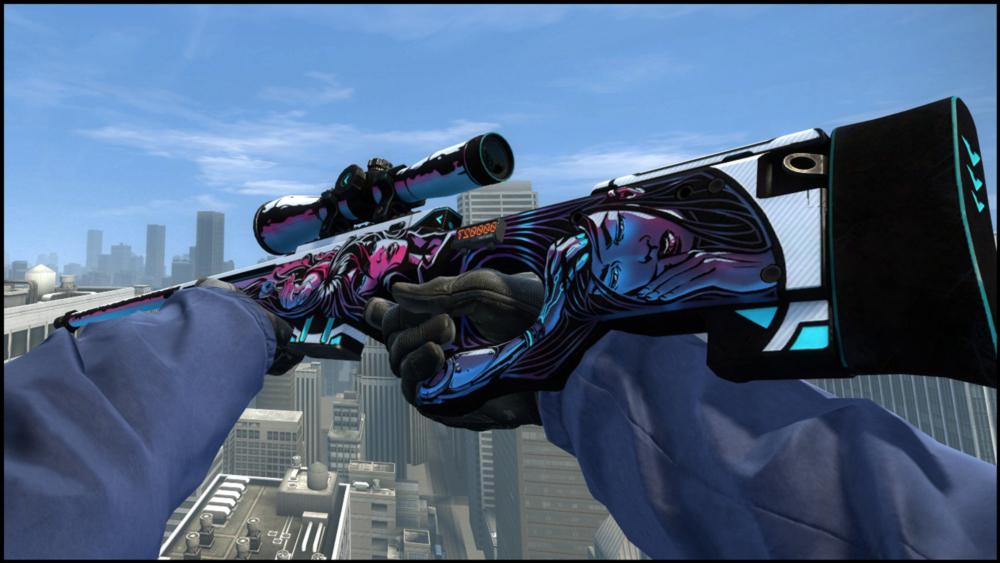
In fact, using this attachment method is helpful in a specific situation, namely when trying to organize a StatTrack weapon. The preferred way to reorder items, shown below in method three, uses trading items to a second account, but StatTrack values are reset to zero as soon as the item is traded. By using a cheap sticker, a player can target important items and strategically place them wherever they want as they move the rest of their inventory.
If a user decides to only use the sticker method, it can get expensive quickly. The stickers must be scraped off in order for Steam to update its data, meaning that a large inventory of skins could cost a small fortune in stickers. If using a name tag, users only have to name the item to update its position.
Method 2: Reorganize your Steam Inventory using the Steam Market
This way of moving an item in a player’s inventory is done in three parts. First, the item is listed on the Steam Market, confirmed by mobile authentication, and then immediately delisted. This returns the item to the player’s inventory in the first spot. Unfortunately, the Steam Market method carries a small but real risk to a player’s items.
To make sure no one buys the item between its listing and delisting, the player must price it at or close to Steam’s $2,000 limit to minimize the chance it triggers a buy order or someone purchasing it manually. Players using this method have to remember that there’s still no guarantee of protecting items that have been listed on the market, so even when proper precautions are taken, there’s no guarantee the Steam Market trick goes smoothly.
Never move things like knives, rare skins, or other expensive items this way. The risk of someone buying the item increases with the average Steam Market price, so the higher the real price, the higher the risk. For example, if a player moves a P250 | Sand Dune and sets the price at $1,800 dollars, it is very unlikely someone will accidentally buy it. But if the they’re moving a StatTrack M4A4 | Asiimov, it’s completely possible that someone could purchase the item. Again, never move expensive items using the Steam Market.
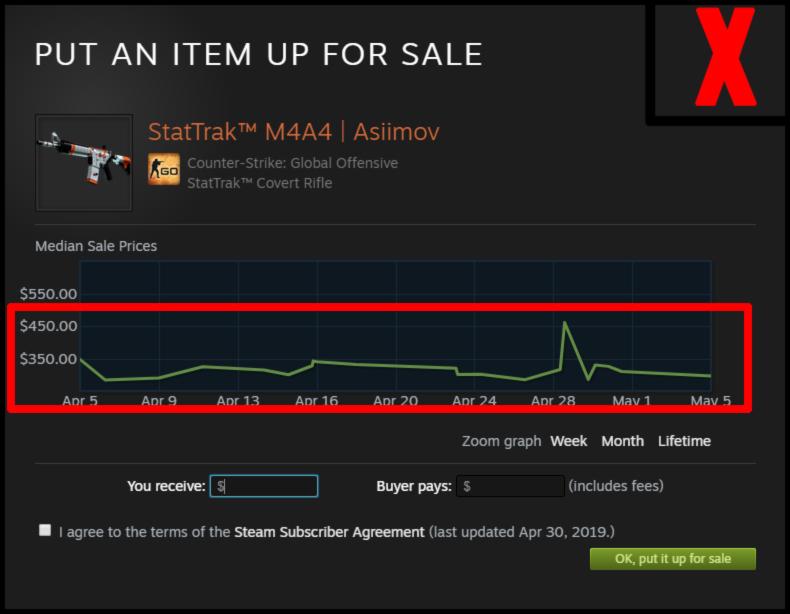
The worst part about the Steam Market method is that it’s painfully slow. There is no option to list items to the Market in bulk, meaning that each item must be listed, confirmed, and canceled individually.
In a way, that’s a good thing. Listing items in bulk would inevitably mean more items sitting on the marketplace for longer. The more time an item sits on the Market waiting for a user to cancel it, the greater the chance that something unexpected happens. But if someone is trying to organize 600 items, this isn’t the way to do it.
This method is okay for moving a small number of cheap items, but players should stay away from it when dealing with anything more than that.
Method 3: Ordering a Steam Inventory by trading
Method 3 assumes that the players has already created, or will create, a second account. It also assumes the enabling of two-factor authentication to further reduce the delay in between trades. Some don’t like this method due to the time it can take to complete, especially if the player makes a mistake in the ordering of the items. But it is the safest method to make sure that a player’s skins aren’t lost.
It’s worth noting that new Steam accounts are subject to a new rule from Valve requiring a purchase of five or more dollars on the Steam Store before they can trade or use the Steam Market.
If users can stomach the one-week trade hold, this is by far the safest and easiest method out of all three. Since the items are reordered through a Steam trade, users will have to have an alternate or second account registered with Steam. Another bonus to this method is that instead of having to order items one by one, players can use Steam’s own trade dialogue to order their items in bulk, cutting down on the time spent having to change each item one by one.
Players trade all of their items to the second account, wait out the item’s trade ban, and then trade it all back in small batches. In this method, the items retain the order that they have going into the trade window as long as users are trading two or fewer items. Here’s an example of what happens if users try to trade large batches.
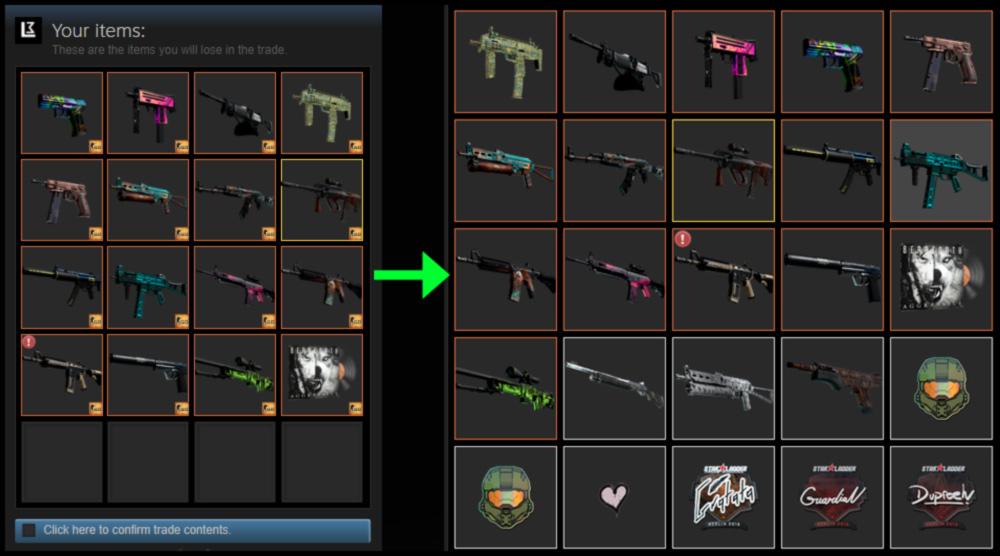
While it comes out close, the order is slightly different than the order the items were listed in the trade window. Players can minimize that by deciding on an order that has subcategories. For example, if a user wanted to order their inventory by weapon type, that could be broken down further into rarities. Since all rarities are technically equal, it matters much less if their order inside their rarity category gets jumbled, and players can break the rarity trade down even more if they want more control.
Having to confirm each individual trade can take patience, but two-factor authentication makes sure that the player’s skins have little chance of being lost to theft or user error. Additionally, since having two Steam accounts isn’t prohibited by Steam’s Subscription Policy, any trade errors can be fixed by Valve.
Players can start by trading the items they want to move towards the end of their inventory back to their main account first. For example, suppose a player wanted their inventory to look like this:
Top or beginning of the inventory
- AK Covert -> AK Classified -> AK Restricted -> AK Mil-spec ->AK Industrial
- M4A4 Covert -> M4A4 Classified -> M4A4 Restricted -> M4A4 Mil-spec ->M4A4 Industrial
- M4A1-S Covert -> M4A1-S Classified -> M4A1-S Restricted -> M4A1-S Mil-spec ->M4A1-S Industrial
Bottom or end of the inventory
They would start at the bottom of the list, trading all M4A1-S industrial skins back to the main account first, followed by M4A1-S Mil-spec, then M4A1-S Restricted, and so on, before ending by trading back any AK-47 Covert skins last.
While it all looks complicated, once a player knows the order they want, the process is as simple as trading the items in the opposite order. The results can be quite beautiful, especially after years of messy and jumbled inventory. Happy organizing!
Recommended

s1mple is offering lessons to help you get good at CS2
Have you dreamed of playing like s1mple?
Recent CS2 ban wave punishes cheaters during live games
Valve is banning players in bulks.
Players hopeful after Valve adds Overwatch to expose CS2 cheaters
Only “trusted” players will be Overwatch investigators.


