

How to take mid control on Inferno using utility
Playing Inferno can be a nuisance if you don’t know your way around utility.
Counter-Strike: Global offensive’s complex map inferno has confined alleys and tight chokepoints that make aim duels redundant. You can use either an AWP or a shot gun and still win the game. Unlike other classic maps like dust 2, Inferno has little to do with the aim. Whoever has the sharper strategy takes away the win in this elaborate map.
Hitting A site is a tall order as apartments are created to provide CTs with better aim angles. B site can become a hellhole, quite literally, if the CTs throw multiple molotovs on banana, burning lined up Terrorists. Conversely, Inferno’s middle can be the easiest to open if you practice a few utility lineups.
Here’s how you can enter A site on Inferno from mid without engaging in duels.
A crucial angle to block out is the top of mid. Smoking deep mid can be tricky as you have to be careful that you don’t walk into the enemy’s crosshair. With your teammate’s cover, align yourself with the mop at second mid and aim up the sky. Place your crosshair next to the tower, as shown in the image.
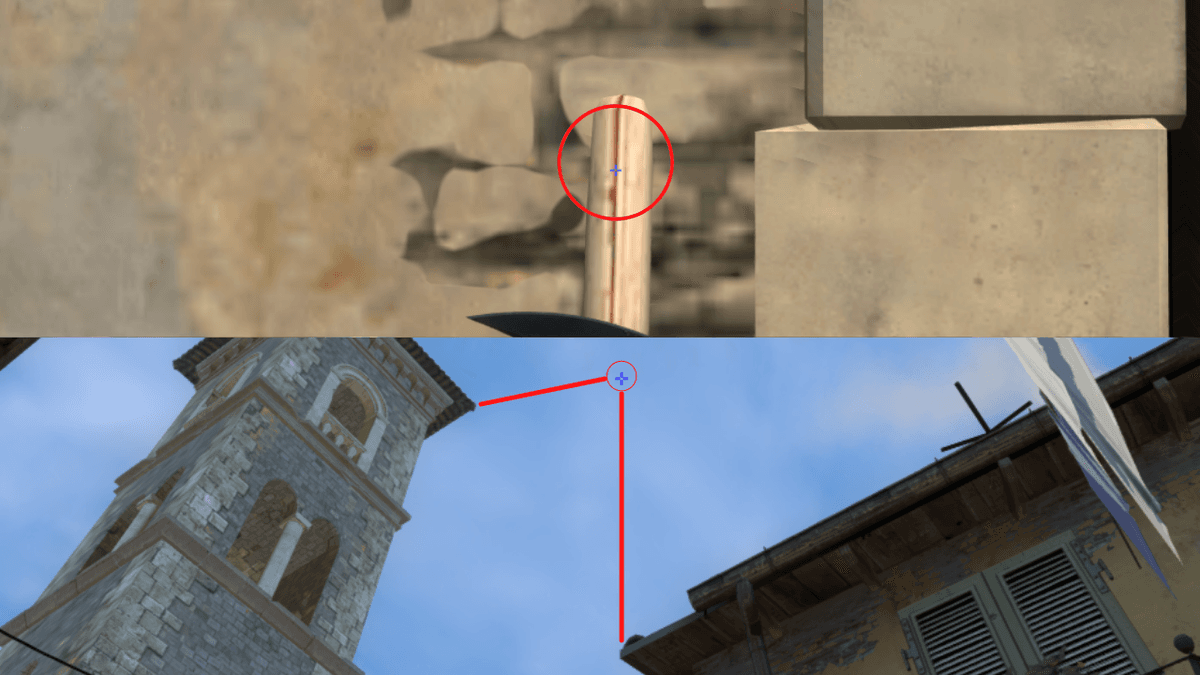
Walk forward and throw your smoke to block out deep arches. Leaving the left side of mid clear is essential because this area will help you with the lineup for balcony Molotov.
As mentioned previously, the choke points at A can be tough to clear out. A well-calculated molotov will evacuate one angle, allowing you to focus more on-site. Stand on the nook at mid, and use the spray crown as your first lineup. Place your crosshair on shingles and run-throw the Molotov.
The primary purpose of this setup is to get the bomb plant at A without engaging in duels. However, when you’ve fried enemies at critical areas, they’ll likely gather at A-arches to pick a fight. Fortunately, there’s a simple lineup that blocks out arches from mid.
Attach yourself to the corner of the mid-wall and aim at the balcony. Place your crosshair in the centre of the railing and throw the smoke. This will land in the middle of the arches, ensuring that your teammates are safe from rotated enemies.
This mid setup will clear out balcony, arches, and top of mid, before you even enter the site. You may also use this setup on half-buy rounds when you can’t rely completely on your weapon.
Here’s how the entire setup should look like:
Before hitting mid for arch smoke, the flashbang is extremely important as you’re still exposed to the enemies on the right side. The pop-flash will either push enemies back or allow your teammates to kill the blind-sighted CTs. This entire setup requires two smokes, which calls for strict team coordination. Using this setup, Ts can easily weaken CT defenses on A site.


Recommended
All maps are now available in CS2, what does it mean?
Poor Inferno players.
Redline creator reveals a sequel skin for CS2
Maybe call it the Orangeline?
CS2 release date: Everything we know so far
Is it CS2-morrow? No, it is not.