

This is how to start a dedicated CSGO server in 2022
Hosting a server in Counter-Strike: Global Offensive lets players control almost every part of a CSGO game, from the players involved to the game modes being played, but it can be complicated to set up if you’re not prepared.
Dedicated servers are one of the best parts of CSGO, with users able to host their own maps, provide other players with wacky game modes, and generally have more control over their experience. The instructions below aren’t too difficult, but they do expect players to have a general understanding of port forwarding, command line tools, and scripts.
Installing a CSGO dedicated server in 2022
We’re going to be installing CSGO’s dedicated server on Windows. Linux users have a a fair number of options as far as distros go, and as luck would have it there’s a recent guide located right here. For the majority of CSGO players running Windows, here are the steps!
Note: CSGO’s dedicated server requires players forward several ports on their network to function correctly. Valve keeps a list of required ports here.
Step 1: Download Steam, download SteamCMD, and set up CSGO’s folders
The first steps are pretty easy, mostly because players probably already have two out of the three. A CSGO dedicated server requires SteamCMD, a command line program from Valve. This is the tool that will download the program that will manage the server and handle updating it when CSGO is updated over on Steam.
If players want to interface with Steam, they’ll also have to have actually bought CSGO. Those who haven’t won’t be able to generate the code they need to tie their server to their account. It’s not needed, but having it offers owners more options than it limits. We’ll cover those limits later on under the GSLT section.
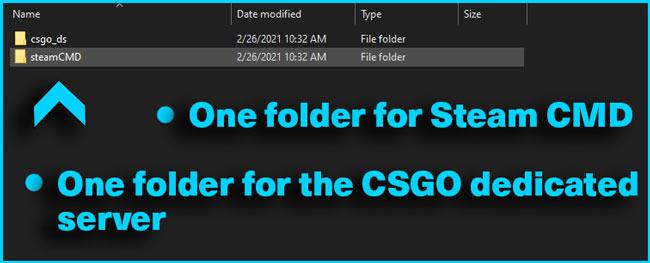
Finally, players have to create two folders. Names are up to the user, but we named ours steamCMD and csgo_ds to keep it simple.
Step 2: Run SteamCMD
Download the official SteamCMD.exe from the Valve Developer Wiki, put it in the steamCMD folder and run it with Administrator privileges. Players should see SteamCMD updating itself. When this is finished, the tool will send users back to the SteamCMD prompt.
Step 3: Log in and set CSGO’s install directory
Now players should log in. For the first download, we recommend logging in through SteamCMD anonymously. Enter the following into the console:
- login anonymous
This command will log players into Steam’s content servers. While players are in the tool, they should also set the install directory for CSGO’s actual server files. They’ll have to tell SteamCMD whereto put the server’s files by “use force_install_dir” to set the directory. This has to be done before downloading the server.
- force_install_dir dir:\path\too\folder
For example, if you created a CSGO dedicated server folder on the C:\ drive, the command would look like this:
- force_install_dir c:\csgo_ds
Step 3: Install the actual CSGO dedicated server
Now that players are logged in and have told SteamCMD where to place the files, it;’s time to actually download the server. SteamCMD uses the Counter-Strike: Global Offensive Dedicated Server AppID as a request. The download clocks in around 26 gigabytes.
- app_update 740 validate
“app_update” is the command for downloading the server for the first time as well as updating the server when CSGO is updated. The “validate” flag is SteamCMD’s version of “Verify CSGO’s files”; it just makes sure everything is where it should be. Note the Steam’s forums have had some reports of SteamCMD failing to install.
The workaround is setting a custom DNS in the player’s network settings. Instructions on how to do that using Google’s public DNS servers can be found here.
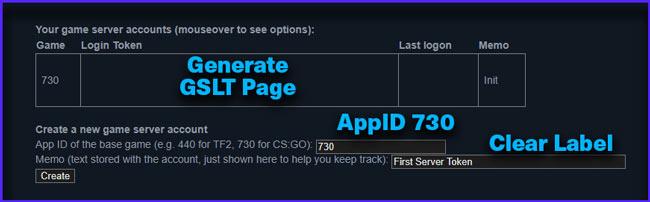
Step 4: Register a GSLT in order for your server to appear online
GSLT stands for a Game Server Login Token, and Valve requires it to reveal the server to the internet. The token comes with some restrictions, the largest being that players cannot install or host any mods that change player skins. The token comes directly from Valve, and players will have to log into their Steam Account and go here to request their token from Valve.
This is an important part of the process, so we’ll let Valve explain it here.
“CS:GO game servers and GOTV relays not logged in to a persistent game server account with a Game Server Login Token (GSLT) will only allow clients to connect from the same LAN RFC1918 addresses (10.0.0.0-10.255.255.255,172.16.0.0-172.31.255.255,192.168.0.0-192.168.255.255).
If your server has a public routable IP address and clients need to connect from outside the server LAN, then you need to get registered for GSLT. To create your GSLTs, visit the GSLT creation utility and follow the instructions here: http://steamcommunity.com/dev/managegameservers.
Each GSLT is restricted for use on one dedicated server instance only, and should be passed on command line with +sv_setsteamaccount “GSLTgoesherenoquotes”.”
This is a secret token and it can only be used once, and if a server breaks the rules, it’s done for good. Players can find the full list of restrictions at http://blog.counter-strike.net/index.php/server_guidelines/. Valve can and will revoke the token for not following the rules. If players don’t need internet access for their server, then Valve has a hands-off policy.
Step 5: Start the CSGO dedicated server
Players can start their server up after they forward some ports and their server using the commands below. These startup tasks can be automated with tools made by the community or by the player themselves.

Here are the base commands for starting a barebones CSGO server, with “scrds” the actual command entered into SteamCMD that starts the server. Players can think of the rest of the arguments as launch options, with most of them coming from two text files in the CSGO server folder called “game_modes.txt” and “gamemodes_server.txt.example” inside their server directory.
- Classic Casual
- srcds -game csgo -console -usercon +game_type 0 +game_mode 0 +mapgroup mg_active +map de_dust2
- Classic Competitive
- srcds -game csgo -console -usercon +game_type 0 +game_mode 1 +mapgroup mg_active +map de_dust2
- Arms Race
- srcds -game csgo -console -usercon +game_type 1 +game_mode 0 +mapgroup mg_armsrace +map ar_shoots
- Demolition
- srcds -game csgo -console -usercon +game_type 1 +game_mode 1 +mapgroup mg_demolition +map de_lake
- Deathmatch
- srcds -game csgo -console -usercon +game_type 1 +game_mode 2 +mapgroup mg_allclassic +map de_dust
Valve’s dedicated servers are a blast, with the game’s community creating a ton of mods and new game modes for players to experiment with. While it isn’t as out of control as Garry’s Mod, it’s still a great time for players that put in the time and effort to set up CSGO’s dedicated servers.


Recommended

All maps are now available in CS2, what does it mean?
Poor Inferno players.

Redline creator reveals a sequel skin for CS2
Maybe call it the Orangeline?
CS2 release date: Everything we know so far
Is it CS2-morrow? No, it is not.